Tires and Suspension
Tire Mounting and Balancing, Shocks, Control Arms, Balljoints, Brakes, etc.
Read More

Fluid Exchanges
Coolant, Oil, Power steering, Transmission, and Washer Fuid... We Do it all.
Read MoreWhy is Maintenance Important?
We’ve all been told that keeping up with our vehicle’s maintenance is important. If you look in your vehicle’s manual, you see there are enough service reminders and maintenance points to make your head spin. Fortunately, there are a few main areas that will, if you remember to keep up with, keep your car operating safely and reliably for years to come.

Easy things to check for your saftey:
Maintaining Your Car
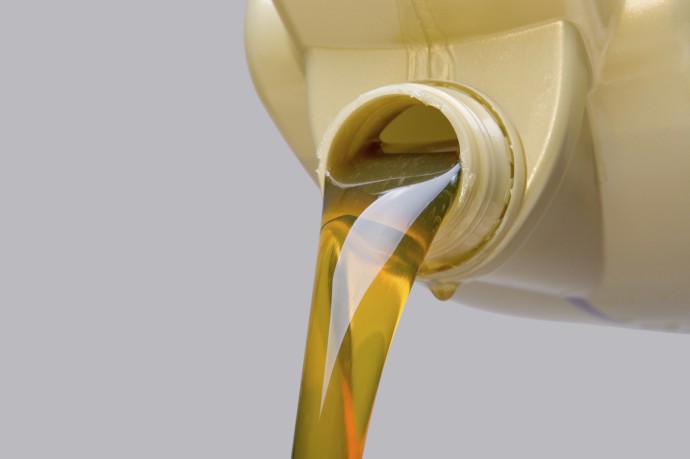
Maintaining Cars Fluids Tips:
Your vehicle has a lot of different fluids running through it to keep it working properly. Keeping an eye on these vital fluids and maintaining them at healthy levels will increase driving performance and help to reduce maintenance costs.
While many car repairs require a skilled professional, maintaining the levels of essential car fluids is easy and possible for even the most automotive repair-challenged drivers. Knowing which fluids you can easily maintain yourself can save you a lot of money and headaches in the long run, so consider the following six important car fluids that should be maintained as recommended.
1. Engine Oil
Checking and changing oil is critical to keep your engine running properly and efficiently. Check the oil level with the engine off and the car parked on a level surface. After opening the hood, remove the dipstick and wipe it clean with a rag or cloth. Then, return it to the oil reservoir. Take it out again and see if the level is within the acceptable range marked on the dipstick. If you’re adding oil, be sure to not overfill, as this can damage the engine.
Most car manufacturers provide guidelines for changing the lubricant – typically, every 3,000 miles or three to six months.
2. Transmission Fluid
Checking the automatic transmission fluid is another vital item on the car maintenance checklist. Find the transmission fluid dipstick and follow the same steps as monitoring the engine oil, but this time while the engine is running. If the fluid appears brown or has a burnt smell, have it checked immediately.
Follow the manufacturer’s recommendations for changing transmission fluid, usually about every 30,000 miles.
3. Power Steering Fluid
If you have a power steering fluid reservoir, check the level visually; otherwise, follow the dipstick method. The fluid should stay level, so if you need to add fluid, have it checked as soon as possible for a leak.
Power steering fluid should typically be changed every three years or 50,000 miles.
4. Brake Fluid
Most, if not all, vehicles on the road today have a brake fluid reservoir that allows you to see through so you can check the fluid level without opening the cap. Once you locate the brake fluid reservoir, you will see markings on the side that tell you if you need to add any brake fluid. If your brake pads are starting to wear, the brake fluid level will drop. If the fluid drops below two-thirds full, you may want to have it checked.
5. Coolant
When you check the coolant, make sure your car has had time to cool down. Locate the coolant reservoir (usually a translucent plastic tank) and eyeball the level of the coolant against the full and low indicators. The engine can be damaged from overheating, so make sure that the reserve tank contains adequate coolant and never allow your car to redline.
Replace most engine coolant or antifreeze every 30,000 miles – or every two to three years. Newer formulas, however, may last up to 50,000 miles.
6. Windshield Washer Fluid
You can check the windshield washer fluid level by looking at the marker on the opaque chamber or by looking into the reservoir. Check the wiper fluid reservoir every week or so and keep it full.
By taking the time to periodically check these fluids, a car will enjoy a healthy and safe level of operation.
.
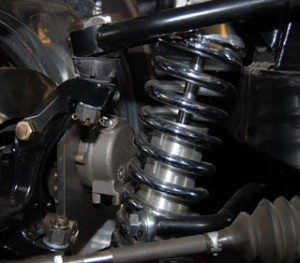
Maintaining Your Suspension
A suspension in a car is a set of shock absorbers and spring coils which maintain the balance of car body even, if there are high bounces or pits. Suspensions of the car are also the necessary element which helps in stopping the car. Thus, the suspension play a vital role in a car and if a proper and regular suspension check is been done, you can get rid of many future arriving alignment problems that cost too high. Here are the three major procedures that you should follow in order to keep yourcar’s suspension swift and healthy:-
Suspension Maintenance: – Always ensure that you get the shock absorbers and the wheel alignment checked from an auto expert or certified mechanic who knows well how to deal with your car model. A presence of a wise mechanic is also needed as suspensions systems are based on many calculations to keep the overall suspension system balanced. In case you alone want to check the suspension, ensure that you go through the measurements given in the owner’s manual for the particular suspension parts. At the time of suspension maintenance check you should figure out if the car leans forward while braking or turning. Also test if there is any sort of asymmetric drive in tyres, as this can be due to improper tyre fitting or unbalanced alignment.
Inspection of Shock absorbers: – Shock absorbers are the major elements of proper or improper suspension functioning, hence, absorbers shouldn’t be neglected. Most often, the shock absorbers are checked in a time span of three to five years according to the manufacturer. While checking the absorbers, see if there are any leaks, cracks or jerks in the absorbers. If you find any leaks or cracks, it is time to mend the absorbers.
Checking the working of suspensions: – There are few simple testing tasks that you can perform in order to check the functioning of suspensions. Take your vehicle to an uneven road, switch off the music or radio system and open the windows, try to listen the sounds coming from the wheels. If there is a squeaking sound coming from the wheels, then the suspensions need to be lubricated or must be replaced. If you hear loud clunking sound, then the suspensions need to be greased. If there are some vibrations coming from the wheels, check if the tyres are properly inflated or not as an under inflated tyre might damage the alignment or suspensions. After the tyres are inflated, check if the vibration occurs again or not. If it happens again, then you need to reset the alignment from an expert mechanic.
.
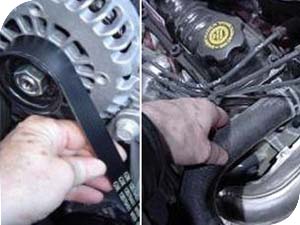
Check Your Belts and Hoses
The belts and hosesin your vehicle perform crucial tasks. Hoses carry coolant, fuel, brake fluid and air. Belts drive accessories such as your alternator and water pump. All systems in your automobile depend on belts and hoses to get the job done. If a belt or hose fails you could be left stranded, or worse. Don't spend thousands on repairs because of a ten dollar hose failure. Inspect your belts and hoses once a month.
Never assume a belt or hose is ok by sight alone. Pinch hoses and check for spongy, sticky or dry and brittle material. Turn belts over and inspect for cracking or fraying. Here are six easy steps to check your belts and hoses:
Step 1: Late model vehicles use serpentine belts. This single belt runs all engine driven accessories. Look for missing ribs, fraying, cracking or cords showing through as pictured here.
Step 2: Older vehicles use v-belts. Inspect v-belts by turning belt over so the bottom of the v is facing you. Look for cracking or glazing.
Step 3: Inspect upper and lower radiator hoses by pinching. Hoses should be flexible and not sticky. Also, look for swelling where hoses connect to the radiator or engine.
Step 4: Under hood hoses perform a variety of tasks. These two hoses carry power steering fluid between the reservoir and the pump.
Step 5: This hose shows typical swelling. If your radiator hose looks like this, replace it immediately.
Step 6: Inspect hose clamps. Make sure clamps are secure and there is no leaking around the hose and clamp junction.
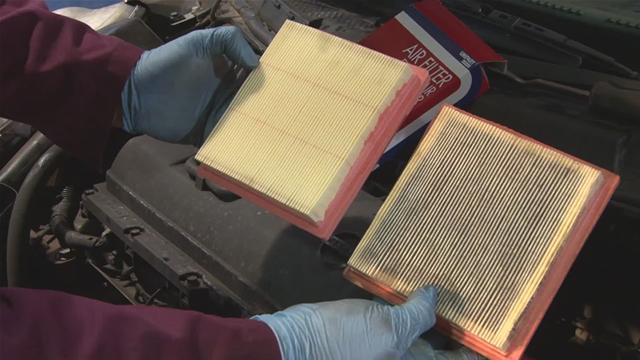
Air Filter
Breathe in through your mouth. Breathe out. Now, take off one of your shoes and a sock. Now, place your sock over your mouth. Now, breathe in. You didn’t get as much air as the first time and you now feel a little gross right? Well, the same thing happens to your engine when your air filter gets clogged with dirt and dust. A clogged air filter can reduce your gas mileage, your horsepower, and even cause your engine to run rough and stall out.
The frequency of which you will need to change your air filter will vary widely based on two factors. How many miles you drive each year and the atmospheric conditions during those miles. Most manufacturers recommend changing your filter ever 5,000 miles. Personally, I think this is premature. I’ve found the air filters in many of my street vehicles to be fine for anywhere between 7,500 to 10,000 miles. If you drive in severe conditions (rural dirt roads, or urban areas with a lot dust from construction) you will probably need to change the air filter more frequently.
If your vehicle’s engine isn’t in the best of shape (burning oil under the hood) those fumes can contaminate the filter as well. In extreme circumstances, these conditions can cause a filter to become unusable in as little as 1,000 miles. Trust me, I’ve been there.
Brake Pads
Obviously brakes are important, but important does not mean complex. Many people take a hands-off approach to brakes and take the word of any mechanic or dealership flunky as gospel. The only rule for how long brake pads will last is this: There are no rules. How often you need to change your brake pads varies based on your driving style, the type of driving you do, the weight of your vehicle, the quality of the brake pads, and the condition of your brake rotors.
Obviously, if you drive aggressively (tailgate others, hard brake at stoplights, etc.) you will use the brakes more often and wear them out quicker than normal. If you drive in a hilly area or in constant stop and go traffic, you will use the brakes more often and wear them out quicker than normal. Getting the picture?
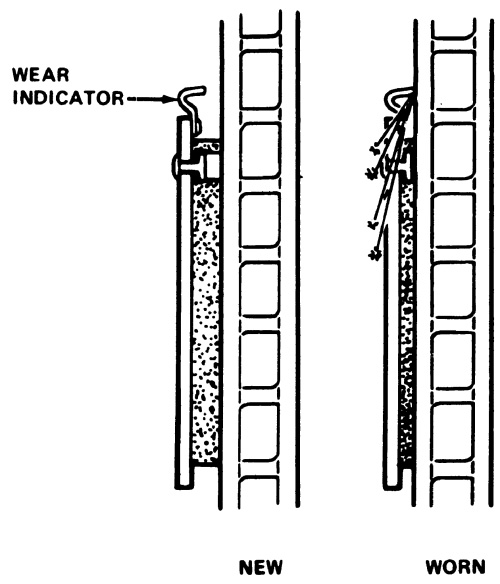
So, how can you know if you need change your pads? You could take your car into one of the infinite number of shops that offer free brake inspections. Unfortunately, if that shop is even a little less than honest, they will tell you that you need new pads. If you own a BMW or other vehicle from a small selection of German automakers, then your brake pads have an electronic monitor built in. When the pads wears down, a light will display on your dashboard.
Even if you own a Cavalier, you’re still in luck. Almost all brake pads come with a built in wear indicator! This usually consists of a small metal tab on the brake pad. As the pad wears down, this tab comes closer to the brake rotor. When it finally makes contact, you will hear a slight screeching or scraping sound.
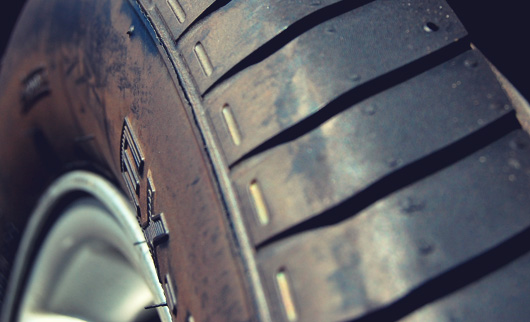
Tires
The last item on our list is the lowest point on your car. The life expectancy of tires, just like everything else on the list, varies. Personally, I’ve owned several sets of Falken Azenis tires that lasted for less than a year. They were good tires, great actually, but they were built for track days and performance driving and that’s how I used them. I’ve also owned tires that never seem to wear out. The BFGoodrich All Terrain tires on my Jeep have around 20,000 miles on them and they still look brand new. Most normal passenger car tires are rated for between 40,000 and 50,000 miles, but the reality of that is hard to judge. Tires go flat, cars get sold, other problems contribute to premature wear, and heck, after 3 or 4 years you’ll probably forget when you actually bought them anyway.
Tires, like brake pads, have built in wear indicators. Between the treads, there are these tiny little ridges that are 1/16 an inch high. When the tread gets even with these ridges, it’s time to get new rubber. In case you were wondering, the ridges are 1/16 of an inch because that is the minimum safe tread depth for a road going tire. This is also the minimum safe tread depth allowed by law in many states. Check your tires every month or so for wear and damage. It only takes a minute. Run your hand over the tread, especially on the inner and outer edges. If you feel anything weird (uneven ridges, waves, wires!) get your tires checked out by a reputable tire shop.
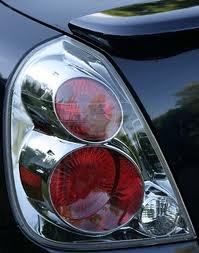
Light Bulbs
Let’s start with the basics here. In many newer cars there is one light bulb per tail light. There are two filaments in each light bulb. One is for your brake light and one is for your turn signal. So when you’re stopped with your turn signal on one filament stays on while the other blinks. Get it? So when this bulb burns out it elimnates your turn signal AND brake light.
Now, how can you tell if a bulb (either in the front or rear of the car) is going out or has burnt out? The first indication is the speed of your turn signal in your car. You know– the click-click-click sound and the flashing light on your dashboard.
Here’s video of a normal functioning turn signal. (Seriously, watch the video. It’s only 6 seconds long.)
Here’s video of a turn signal that’s indicating a burnt out bulb. (If you skipped the video above you really need to watch this one.)
Notice how the turn signal speeds up, blinking and clicking faster than normal, when there’s a burnt out turn signal/brake light bulb?
Now we know that at least one of the two right turn signals is burnt out based on the turn signal icon on the dashboard. But is it the front or the rear bulb? Or is it both? Here’s a trick to find out: Park your car in a safe location. Turn on your hazard lights. Walk around your car and see which light(s) isn’t/aren’t flashing. I didn’t walk around the car for the video because we knew it was the right rear tail light, but you can see what I’m talking about with the hazard lights test in the video below.
I’ll cover how to replace a turn signal/tail light bulb in the next car series installment. This is something you can easily do in your driveway in under 10 minutes.
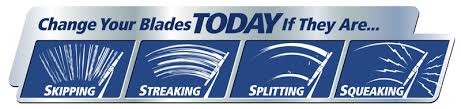
When inspecting wiper blades, look for the following:
- Broken frame – detachment of frame arms at joints or connection points.
- Metal Corrosion – especially at joints and claws.
- Visible cracks, tears, and missing pieces in the rubber squeegee’s edge.
- Flex rubber squeegee back and forth to see if it is still flexible. Aged squeegees will have difficulty conforming to the shape of your windshield and create streaks.
- Check squeegee wiping edge for rounded edges which can prevent the wiper blade from making strong contact with the windshield and reduces wipe quality.
- Tug to ensure wiper blade has been securely installed on the wiper arm.
- Check that squeegee is secure in the wiper frame.